Intro To Rails
Goal
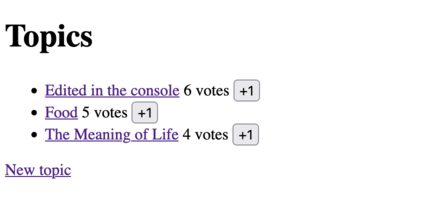
To teach you Ruby on Rails we are going to use a "Real World" example. You've decided to create a voting system for you and your friends to play with. You've decided at a minimum, you'd like to allow users to:
- view the topics
- vote on topics
- create, edit, and destroy topics
You've sketched up an initial screenshot of what you want it to look like:
Meta-Goal
When you have completed today's goal of getting the basic application online you should understand:
- Basic Ruby syntax
- How to try your Ruby code (IRB)
- How to go from requirements to a new working Rails application
- How to get work with your application online at replit
- The basic tools a RoR (Ruby on Rails) developer uses (editor, rails console)
Schedule
- 1-ish hour of Ruby
- 4-ish hours of Rails, broken up in 1-ish hour steps
This is just a rough guideline, not a mandate. Some steps you'll go over and some you'll go under. It'll all work out by the end of the day. Probably.
Requirements
We're going to be working with:
- replit.com
- Ruby 3.0.3 or greater
- Rails 7.0.1 (the last two numbers are not important)
- Bundler
- SQLite
Everything should be set up the night before during our install-fest. Please ensure you have everything working before you show up for RailsBridge on Saturday.
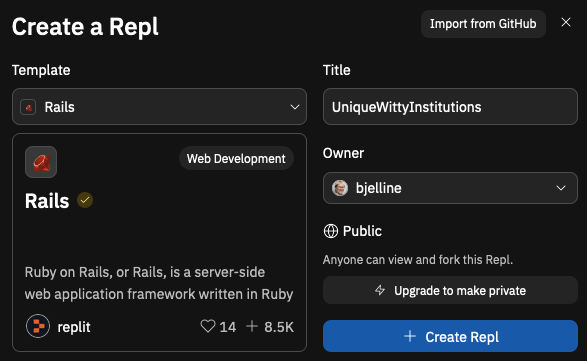
Go to replit.com and create a new Rails Project from the Template. Chose the Templated called "Rails", chose a Title for your project and then press the blue "+ Create Repl" button.
Make sure you can see a window label "Shell". In this window type:
$ irb
>> 1 + 2
=> 3
$ exit
Can you see the green "Run" button in the upper middle of the replit screen? Press it to start your rails application. Open the webview window in a separate Browser Window or Browser Tab by pressing the arrow.
With this setup you should be ready to edit your code an see the changes in the webview window.
Format
Each lesson will look like this:
Step Title
Goal:
Description of the current step.
Red because big goals are important.
Steps:
steps to take.
def code_to_write
  1 + 1
end
Yellow because we've gotten it done, but we're not sure yet what's going on.
Explanation
Details of what the steps actually did, explaining the cause and effect.
Green because we can tie everything together now.
Next Step:
Go on to Ruby Language